Showing posts with label character. Show all posts

Friday, February 7, 2014

Carl's Portrait continued...

Work is just crazy busy at the moment so I was only able to grab a short while to sketch on Carl's portrait; here's where I left off from before...


The face is lit by bright sunlight, coming from the right hand side of the image, and I'm trying to keep that sense of warm sunlight flooding the face. So each stage of tonal build-up is carefully done, so as not to darken the whole portrait too much.


Using the mechanical pencil I very lightly start adding lines to build the form of the nose. To soften any lines that I don't want showing I use the end of a Q-tip or cotton swab, very gently rubbing the pencil to blend and soften the marks, but always being aware of where the darker build up of pencil is going; I don't want to distort the look of the nose. As I'm blending, if there's too much pencil on the Q-tip I just grab another one. There are different tools you can use for blending; I just find the cotton swabs easiest and they're cheap and plentiful.

When I've done some work on the nose I move back to the forehead.


Again, I'm laying down a subtle layer of pencil and blending using the cotton swab. Any excess pencil that builds up I carefully remove with a putty rubber, and then gently blend again. I move around the face this way, building tone and form a little at a time, so as not to overload any area of the portrait with too much dark pencil. I need to retain that feel of sunlight, so doing a little at a time works best for me.

That's all I've got time for, the sculpting is calling, so this'll have to wait again til tomorrow!


Thursday, January 16, 2014

Carnival Portrait Finished.

There wasn't much work left to do on this drawing, but it was at a critical point where I could really mess it up. This is how it looked yesterday...


Using the medium black Bic biro pen I continued the gentle build up of layers of pen marks.


I use the word 'gentle' because if you press too hard with the pen you put down a very dark mark that you can't undo, and so everything else around it has to be that much darker for it to blend. In doing this you lose the ability to create the illusion of solid form; you can use darks and lights to suggest the three dimensional form of the eyeball and socket in the face.


So by gently building up layer on layer of lighter pen marks I can create the depth of darkness that I need to suggest the eye as it sits back in the socket, as well as making it look like there's make-up on his face.


Even at this stage, close to completion, I can still get it very wrong. To keep control of the sketch I step back after every few marks and look at it from a distance to check I'm not making one area too dark.


At this point I think I've finished. But after getting a cup of coffee and coming back to it, I realize the bottom of the eye, where the skin of the lower lid covering the eyeball bags a little, it looks too prominent and it's distracting my focus. So I add a few more pen marks to darken it up a little, blending them so the skin looks smooth and soft.


The difference is almost imperceptible, but put them side by side and hopefully you can see it.


It's always worth taking a little time out from a sketch and coming back to it, to see what doesn't quite work. But it's also good to know when to stop! I set out with a loose idea of a sketch, no definite plan, but knowing I wanted to create a face which looked like it had make-up on the skin. I'm happy with this one at this stage and it's a good practice run for a more developed sketch in the future.

Just a quick note: the images on the blog are yellowish in color - this isn't because I'm drawing on yellow paper, but because I'm often sketching in the evening under artificial lights and taking photos with my phone camera and uploading them with only a change to the brightness of the image. This is how the same image looks without the yellowing of artificial light...


Quite a difference! But keeping up with the blog and sketching every day will often mean slightly yellowish images as it's the quickest way to get the blog done!

Thanks for reading.


Wednesday, January 15, 2014

Carnival Portrait continued...

I'd been looking forward to getting back to this drawing, although I'll admit I'm a little nervous about sketching the make-up on the face in case I screw it up, but nothing ventured, nothing gained. So here goes!

I decide to define the eyebrow before adding in the shading for the make-up. Still using the medium black Bic biro pen I start gently adding the strokes of the hairs that create the eyebrow.


I follow the same directions as the hairs when making the marks with the pen, and the hairs go in different directions, overlaying each other, thicker in some places and sparse in others.


It's really just a case of patiently laying down lines to create the mass of hairs, but how you apply pressure really matters when making the marks with the pen - where the hair comes out of the skin needs to be lighter than the other end of the hair, so the pen stroke needs to reflect this.

This character's hair is very dark, and the eyebrow needs to be dark as well, so I continue layering the pen marks, still paying attention to the direction and thickness of the hairs.


Once I'm happy with that, I move back onto the shading around the eye, but not because I'm still trying to avoid the moment when I start the make-up! I need to plan how the make-up will sit on top of the skin and so I need to define the detail under the eye first. This is an older character, with lines and slight bags under his eyes so I lightly shade those in and then start adding the make-up.


As I add the make-up I follow the highlights and furrows of the skin.


Slowly, I work down the face, adding the carnival make-up detail, all the while checking the depth of shading on the overall face so that the drawing stays in balance. The shading around the eye needs more attention as I add the darker layer of the make-up, so as to not lose the form of the eyeball and socket.


Time has gotten away from me, and I'm not going to get this finished today, but I'm happy with the sketch so far. It doesn't seem like I've done much work when you compare it with yesterday but building the shading takes a lot longer than it seems.


It's looking good. Let's hope I don't mess it up tomorrow; you can't erase pen lines!


Tuesday, January 14, 2014

Picking Up Where I Left Off...

Time to resurrect this blog; work is crazily busy and so now it's more important than ever that I find time out each day to sketch for pleasure rather than just designing for work. It also helps that over the festive season I bought myself a gorgeous new drawing board and have been itching to get started with it!

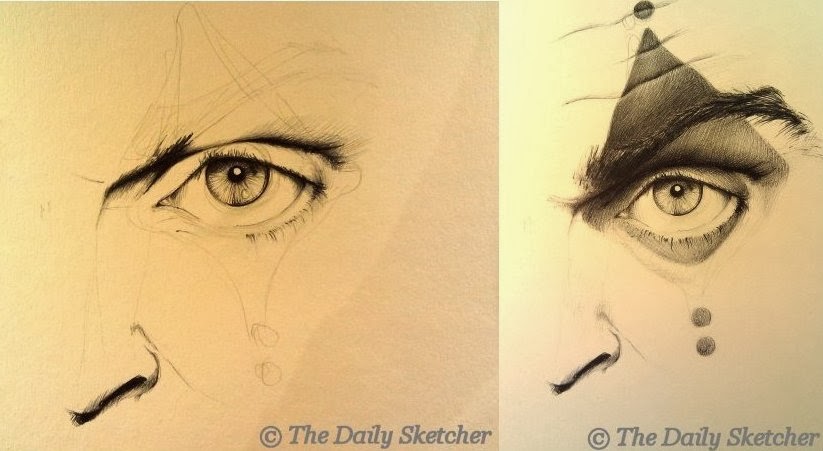
The first sketch has no definite plan, I've just taken a reference image of an eye and sketched it roughly out using a mechanical pencil with a HB 0.5mm lead on Daler Rowney Cartridge paper which has a smooth surface.

 At this stage I'm not going to draw the whole face - this is really just a practice run, getting my hand back in, so I'm just focusing on a small part of the face and working on my control to build detail.

Once the image is roughly sketched in pencil I start using a different drawing tool, a black Bic medium biro pen.

 Most people just use these pens for writing but I love drawing with them. They can be used in a similar way to a pencil, creating soft shading and dramatic light and dark effects, but I have a habit of smudging pencil, and I find the pen work much cleaner.

So, in the same way I would if I was using a pencil, I start to define the dark areas of the eye.

My pencil lines provide a guide, once the pen mark is down on the paper there's no going back so the rough pencil sketch really helps at this stage.


The iris of the eye in the reference image is a pale color so I have to keep the pen marks in the iris to a minimum whilst still trying to make it look realistic, but when I reach a point where it looks okay I leave it and move on to the surrounding area of the eye. I can always come back to the iris later if it looks too pale but if I over-work it now the whole image will fail.

 As I said at the beginning I don't have a definite plan but I will be doing a series of carnival character portraits in the future, so I'm thinking of trying some carnival make-up on this image. I need to extend the image to allow for that, so I add in the nose.

I don't need to sketch the whole side of the nose in, because at this stage the light and the dark shadows are suggesting the form for me. With a tiny bit more shading on the nose, I return to work on the eyelid.

The eye needs a lot more work but I'm starting to think about how the carnival make-up will sit on the skin so I've sketched out a rough pattern and I'll work on that tomorrow.

Wednesday, November 16, 2011

Talk like a pirate....

My fingers are all healed and I'm back working, sculpting and sketching away! So hopefully now I'll get back on track with this blog, healed fingers crossed.

Amongst my travels and activities during these few months I've joined a re-enactment group and plan to be a historical pirate! So there will probably be a lot of historical influences showing through in my sketches, and I have no doubt that will also influence my sculpting. First up is a portrait of one of the group's established re-enactment pirate characters 'Pete'. This portrait is taken from a photo so the first thing I did was ask permission to use the photo. That granted, off I went.


I measured the features from the photo and sketched them out at the same size on the blank paper. Again I'm using a Strathmore Drawing pad, with a medium surface and medium weight, a mechanical pencil with a HB 0.5mm lead and a small Crimson & Blake putty rubber, with lastly, a sheet of plain A4 paper to lay over the drawing as I sketch so that I don't smudge the graphite already laid down.


I always start with the eyes, to me the most important part of the portrait, if these don't look right back out at us then the portrait won't work. And I'll return to them constantly, as I build up the shading. I start with the darkest shade of the pupils and plot the highlights in the eyes and then work up the tones around them. I build up the shading gently around the eyes because there is a lot of detail in this small area and I want to capture as much of this detail as possible.


Looking at the photo I'm trying to plot out the areas of dark and light. This will give me the overall form of the face and make the face look more three-dimensional. The lightest point is the tip of the nose and the front tip of the tricorn hat, but the light is reflecting more off the nose so this will mean I leave the paper white and lightly shade in the highlight on the tricorn hat. I also think about the composition of the sketch, and I may push things into the background by making them darker if it suits the composition better.


I realise I have a habit of working from left to right in pretty much all of the portraits I do, not sure what that means, I just happened to notice it. Anyway, to build up the shading I'm using hatching and  cross-hatching lines, both in larger sweeping motions and small controlled strokes. You can see this most clearly around the edge of the hat and face. I'm not blending the lines on the face to make the shading smoother because I want the skin to look slightly rougher, he's an older man (not that old, but older than me!) and he's portraying a pirate so I want some roughness to the portrait. 
A truly amazing artist that uses lines to build up fantastic drawings is Laurie Lipton - to borrow a quote from her website by 'Artweek' magazine “Technically Lipton is a profound draftsman. She captures nuances of light and shade with masterful proficiency.” The size of the image files means they take a while to load, but I promise you it's worth the wait.


I've made the decision to concentrate solely on the face and not add in any detail of the surrounding environment; there's enough expression in the face to hold our interest without adding further information into the sketch. This is also greatly helped by choosing a good photo and having a good photographer who knows how to capture the moment. To emphasise the features and expression of the face at this stage I'll make the shading around the face very dark. It will help give the face more form, push it forward to become the focus and give a little more drama. I'm framing the face with a dark surround but I still have to watch that the overall tones so as not to flatten the form of the face. I'm starting to put in the detail on the chin. This is tricky because there is a lot of dimpling and texture but I still want the focus on the eyes, so I work the two parts of the sketch simultaneously.


The detail is there but it's a little too dark....


...but with a careful  application of the putty rubber I lighten the area until it fits in with the tonal plan of the sketch. With the hat and pipe left to complete I choose to loosen up on the sketch, adding in the shading but not to the same level of detail as the face. I want the face to really push forward in the overall drawing....


And that's it, completed! I think it's a good likeness, an interesting drawing, with just the right balance of detail and loose sketching and a good portrayal of an 'historical' pirate. Arrr!


Wednesday, August 24, 2011

Mastering Left-handed Sketching!

Well 'mastering' may be too strong a word but I have managed to finish my first sketch done with my left-hand. Having injured my right I'm endeavoring to continue my quest to sketch daily, now with my left hand, although admittedly at the moment it's more like once or twice a week! Not deterred by this, today I finished the left-handed sketch of one of the gargoyles from Merton College in Oxford. I've been using my favoured mechanical pencil and my Strathmore medium surface sketchpad.


Taking another look at the sketch I realised that the tonal values were not broad enough, I needed to have more tonal values and a greater distinction between the lights and darks. To do this I went back over some of the areas I'd already shaded and darkened some and then used the small eraser on the end of the mechanical pencil to gently lift off some of the lead in the lighter areas. Usually I would use a putty or kneadable eraser to do this but the mechanical pencil is all I have to hand and to be honest, it does an okay job given that my left-handed sketching is no Rembrandt!.


So hopefully you can see the difference in the tonal values between the two images. I think it makes the form look more solid. I'm still having to turn the sketchpad regularly to be able to shade at a more comfortable angle but I'm noticing that I have a little more control over the fluidity of my wrist movements so I'm not turning the pad as much as yesterday. Another noticeable difference in the sketch itself to those done with my right hand is the pencil marks are more visible; by that I mean the blending is rougher and so you can see the individual marks that make up the shading more easily.


I'm leaving the sketch as it is at this stage, I think to sketch in the hood would lose the form of the face as the tonal values are way too similar. It could be that my brain and my left hand are a lazy and easily bored combination and I want to go onto a new subject! On the whole I'm very happy with the results and well on my way to mastery!

Tuesday, August 2, 2011

Fantasy Head - Skull with Horns Part 2

It's been a few days since I've been able to pick up my sketchbook and any kind of drawing implement but thankfully I was able to get back to the fantasy head I previously started. I never really had a plan for this drawing, I just wanted to sketch and let the ideas flow.


I decided to break up the symmetry of the image and sketch a shorter horn on the left. I also wanted the horn to twist at a different angle making it look more natural. I've been sketching the image with a mechanical pencil, laying a sheet of paper over the sketch so as not to smudge it.


I like the asymmetry of the horns and it doesn't detract from the overall image, I think it strengthens it by adding more interest. The head does look a little 'empty' though, I think it needs some eyes to give it more character.


I'm not worried about the anatomical accuracy, the fact that the eyeballs are floating in the sockets, it's the imagination behind the image that's important to me. I am aware that the eyes do need to look like they belong to the skull though, that it can actually see, rather than it looking as if the eyeballs have just been placed into the skull.


I'm not sure about the development of the teeth, but at this stage I'm going to leave them as they are now and come back to them later and decide then.


From the outset I've seen this head in my mind's eye in a very dark setting with a strong light, probably influenced completely by my love of chiaroscuro - the strong contrast between light and dark creating a strong sense of three-dimensional form and drama. I love the eyeball - it looks really solid, like you could pick it up with your fingers!


Using a black Biro pen I create hatching and cross-hatching lines with a light touch on the paper where the light hits and building darker and darker layers of lines where the shadows are deepest. The white of the paper is left bare where the light is strongest.


I still haven't finished sketching the details on this image, I'm still deciding what will fill the open mouth, but the shading I've added has no impact on that part of the sketch. There's a lot of work still to go into this drawing but time's not being kind to me at the moment! I shall return to it another day.

Sunday, July 24, 2011

Quick Character Sketch

Just a couple of quick sketches today. I thought I'd revisit one of the character heads I've sketched in the past for a sculpture. As I've mentioned before I had a habit of merely sketching the heads from only one angle - face on - and filling in the blanks with my imagination as I sculpted the character in 3D. So today I decided to quickly sketch the head from four different angles.


So I start with the outline of the basic head shape, measure out where the facial features sit, remember to put the eyes halfway on the face, although the eyes are disproportionally large; this is intentional.


I sketch the lines across the paper so that the next sketch lines up with the first and the measurements remain consistent. This time I sketch the head at a slightly turned angle.


I had a tendency to misalign the features when the head is slightly turned but the practice is paying off, I only have to re-draw the mouth, everything else gets put in the right place first time!


Again sketching the measuring lines across the page I sketch the head from the side this time. This angle is an easy one. I won't sketch it from the other side because the hair pretty much blocks out the face.


The back is slightly trickier because I'm trying to show more structure and form in the hair, but I don't think I've represented it accurately.


So that's the quick character sketch from four angles.